Geographical Reference Systems (WIP)
Innehåll
Latitude and Longitude
°=Degrees, '=Minutes, "=Seconds
Latitude
Latitude specifies north-south position and ranges from -90°S to 90°N where the equator is at 0°.
The position is given in degrees (00-90°) followed by minutes (00-59') and either seconds (00-59") or decimal minutes (.00-.99') and ends with N/S to indicate northern or southern hemisphere.
E.g: 41°55.89'N or 41°55'53"N
Longitude
Longitude specifies east-west position and ranges from -180°W to 180°E where the prime meridian defines 0° (passas close to Greenwich).
The position is given in degrees (000-180°) followed by minutes (00-59') and either seconds (00-59") or decimal minutes (.00-.99') and ends with E/W to indicate east or west of prime meridian.
E.g: 041°51.68'N or 041°55'41"N (Note that the degrees are given as 3 digits)
Conversion
30 seconds = 50 decimals (hundredths of a minute)
- - To convert seconds to decimal minutes you multiply by 1,6667
- - To convert decimal minutes to seconds you multiply by 0,6
UTM

UTM divides the Earth into 60 zones stretching from 180°W to 180°E and each zone is 6° in width. (Zone 01 covers longitude 180°W to 174°W and zone 60 covers longitude 174°E to 180°E). The zone number are followed by N or S to indicate northern or southern hemisphere. (E.g 33N)
UTM refers to an exact position and are given as the distance in meters relative to the each zones central meridian and the equator.
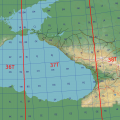
The central meridian coincide with 500000mE and are the thin blue lines presented in the image on the right. Any position along those lines have an easting value of about 500000mE.
As an example, the red dot in the image on the right indicates the city of Motala which has a position of 33N 502741mE 6488614mN. (502741mE indicates that it should be close to the thin blue line)
MGRS
MGRS is based on the zones in UTM but also devides the Earth into 20 bands (C-X, omitting the letters "I" and "O") stretching from 80°S to 84°N and each band is 8° (Band X is 12°) in hight. (Band C covers latitude 80°S - 72°S and X covers latitude 72°N - 84°N)
Each UTM Zone is devided into 10 mile squares. The squares are named with two letters, the first is a column letter (A–Z, omitting "I" and "O") followed by a row letter (A–V, omitting "I" and "O").
Finally, the position is indicated within the 10 mile square measured from the bottom left.
The position can be given in 2-10 digits (always even) depending on the resolution and they are equaly devided in two sets (E.g 2+2, 4+4 etc.). The first set gives the easting measured from the left edge of the square and the second set gives the northing measured from the bottom edge. The first digit in each set is the amount of miles, 2nd=kilometers, 3d=hundreds of meters, 4th=tens of meters and 5th=meters. (e.g. a 10 digit position defines a square 1m x 1m)
Note that the precision of the coordinate also depends on what system you use and how you use it. The TGP might give you a 10 digit grid, but if you don't use the LRF when measureing, it won't be as accurate. (You will just miss the target more precisce)
Exampel:
KUTAISI Towers position in 10 digit MGRS.
1. Identify the Zone.
In this case it's 38T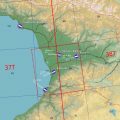
2. Identify the Square.
In this case it's KM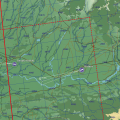
3. Depending on the resolution needed you can give the position as 38T KM 91 whitch gives a square (10km x 10km) with the bottom left corner 90km east of the left edge of square KM (red dashed square) and 70km north of the bottom edge.
In this case we need to be more precisce.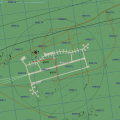
4. We zoom in further and see that KUTAISI Tower is located in KM 9172 which means a square thats 1km x 1km and 91 resp. 72km from the edges of KM. We still need to be more precisce.
Now we need to measure using the ruler and we always measure from the left and bottom edges of the square(in this case KM9172). We get that the tower is located 950m east of left edge and 900m north of bottom edge.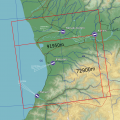
5. Now we find out the altitude and add it all together and we get: 38T KM 91950 72900 A45ft. When transmitted "38Tango Kilo Mike 91950 72900 altitude 45feet"
- Standard unit for altitude is meters, if given in feet, be sure to clarify "feet"


Coordination/Deconfliction
Here are examples of methods for coordinating combat within own crew or flight, but also applicable between flights, entire packages and ground forces. Having a common basis for reporting and orientation is of great importance to be able to effectively coordinate and reduce the risk for own units.
Division

This method is best suited when entering a battle position with limited time to prepare and with a wide area with no or few clear terrain objects.
Lead specifies the border left and right and the area is then divided from 0 to 10 (left to right).
E.g: "Target area from edge of town untill road crest, Lead will scan 0 unto 5, Two will scan 5 unto 10"
Two then detects a truck in the middle of the area. Then he can easily orient lead:"Truck, on the road at 5"
Coordination Lines
