CASE 1
Home >> Standard Operating Procedures >> Carrier Ops >> CASE 1
This section holds all CASE 1 procedures that are relevant for our use in DCS.
Main Sources: https://www.cnatra.navy.mil/local/docs/pat-pubs/P-816.pdf and replies from GB.
Important note: IRL the procedures during carrier quals differ quite a bit from cyclic ops. The procedures here are based on cyclic ops procedures, but have elements inspired by CQ procedures, in the ambition to have procedures that work well in our context where DCS visibility is limited, the skill level of individual sim pilots may vary and so on.
What is CASE 1?
CASE 1 is the state when it's daytime and the weather allows for good visibility around the boat. Formally, it's "during day VMC (Visual Meteorological Conditions) conditions (WX 3,000-5 or better)", meaning the ceiling is no lower than 3,000 feet, and the visibility is no less than 5 nautical miles.
Short Summary
Departure
- Take off and perform a small clearing turn.
- Continue along BRC (the carrier's heading) at 500 ft and 300 kts until 7 nm DME.
- Climb freely.
Recovery
- Flight leader contacts Marshal (Ch 16 261.00) at ~50 nm DME. Report flight members, position, altitude and lowest fuel. Hook down!
- Approach the carrier, making sure you're on assigned altitude before 10 nm DME.
- When visual (typically 10 nm DME) report "see you at X nm". Switch to Tower (Ch 1 305.00). Go Fingertip Left formation.
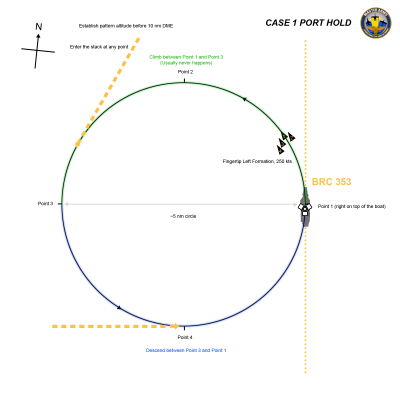
- Tangentially enter the 5 nm diameter port hold (see image) at 250 kts at any point in this circle. Maintain Fingertip Left formation. The port hold circle is located to the left of the ship, with its rightmost point (point 1) being right above the boat.
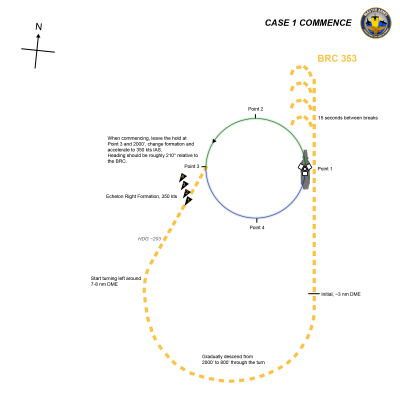
- Flights at angels 2 commence at point 3 in the hold, going Echelon Right formation and accelerating to 350 kts, slowly descending to 800'.
- As flights commence, the flights above descend in 1000' steps maintaining SA by looking around, aircraft sensors and (if absolutely necessary) comms.
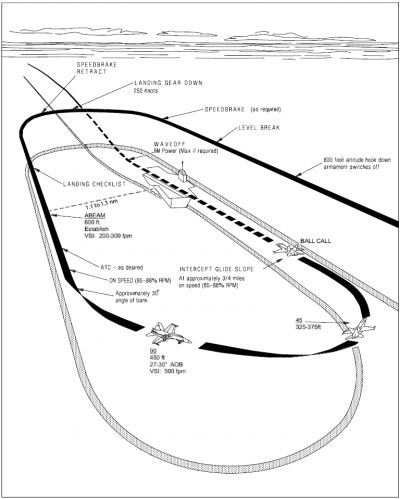
- Break at 800 ft and 350 kts shortly after the bow. 17 second intervals between each break.
- Aim for 1.2 nm from the boat when abeam, at 600 ft. Turn final immediately (i.e. when you got the boat on your 9 o'clock) and land.
Resources
- Jabbers Youtube Video, explaining how to fly a CASE 1 Recovery.
- Bankler's CASE 1 Recovery Trainer, a DCS mission giving you feedback on how well you're flying the pattern.
Detailed Instructions
Departure
On The Boat
- Set radio to Tower Ch 1 305.00.
- When your flight is ready to depart, taxi to the catapults (Cat 1 is the right-most, Cat 4 is the left-most). Do not request taxi. Only use comms if needed to sort out issues.
Takeoff
- With ~10 second intervals, call out your launch, ex "400 (Four Zero Zero), salute!" and take off.
- Make a small clearing turn to the right (if on cat 1 or 2) or left (if on cat 3 or 4).
- Turn to the BRC. Climb to 500 ft and accelerate to 300 kts.
- At 7 nm DME, start climbing to desired altitude.
- Flight lead decides when to leave the frequency and go to the package channel.
- Form up with your flight.
Recovery
Arriving to the Carrier Control Zone
- Perform HAIL-R checks:
- H - Hook down.
- A - Anti-skid off / Altimeter. (Also set/confirm Hook Bypass to CARRIER)
- I - Instruments. (TCN, set up HSI and CRS, turn on ILS if preferred, general checks)
- L - Landing weight / Lights For Hornet: Max 34k lbs. Master Light Switch Off.
- R - RADALT (Pilot preference. 380' is recommended)
- Before 50 nm DME, switch to Marshal channel Ch 16 261.00.
- Flight lead contacts Marshal stating your flight's members, position, altitude and lowest fuel state. Marshal will provide your Marshal instructions.
- Comms example:
- You: "Marshal, 400" (i.e Four Zero Zero)
- Marshal: "400, Union Marshal"
- You: "400 (holding hands) with 401, marking Mother's 070 for 48, angels 14, low state 6.5"
- Marshal: "400, Case 1, BRC is 264. Expected Charlie time 22. Report see me."
- You: "400"
- In the rare event that you haven't already gotten a pre-briefed holding altitude, Marshal will provide you with one (anything from angels 2 and above, in 1000 foot increments).
Entering the Port Hold
- If available, set your course line to BRC, scaling the HSI to 10 nm.
- Descend to the holding altitude before you have reached 10 nm DME.
- When visual (typically 10 nm DME)
- You: "See you at 10"
- Marshal: "400, update state, go button 1"
- You: "400, 5.9" (or "400, low state 5.9" if it's a two-ship)
- Switch to Tower Ch 1 305.00.
- Enter the holding pattern from any direction, tangentially on the 5 nm diameter circle on the port side of the ship.
- Fly 250 kts IAS in a half standard rate turn. This puts you pretty close to a 5 Nm diameter, depending on wind conditions. If you fly like this it will take you 4 minutes to complete one full circle.
- Wingmen should fly in parade formation. #2 on the right side of lead, 3# on the left side of lead, and #4 on the left side of #3 (like an Air Force "fingertip left" formation).
- If there is another flight on your level (which is perfectly normal) you should strive to position yourself on the opposing side of the circle. This will ensure proper commence intervals.
Exiting the Port Hold
- In most cases, there will be a prebriefed "charlie time", simulating when the carrier is ready to recover aircraft. This indicates when the first aircraft is expected to show up in the groove. That means that the first flight need to commence from point 3 about 4-5 minutes before this time, depending on how tightly you fly your turn to initial and when you break over the carrier (i.e normal break at 1.0 nm or Shit-Hot-Break).
- Tower may give a global "99, signal is charlie", upon which the the recovery procedure might begin right away with the flight at the lowest level going first. This is not usual though.
- The flights above the first flight descends between point 3 and 1 and flights commence at their own will when it looks clear below.
- We aim to be "zip lip" (no radio comms). But comms should be used if needed for safety-of-flight and if needed to keep things running smoothly.
- When you exit the holding, you should be on the left-most end of the circle (i.e. point 3). Exit backwards in a little wider tear drop-shaped style (aiming towards BRC+210 degrees or the counter course +30 degrees). You should no more than 7 nm away from the boat when you start your left turn towards the boat.
- A tighter pattern without teardrop (or with a minimal teardrop) can also be used, for instance if you are late and need to catch up.
- Accelerate to 350 kts IAS gradually. #3 and #4 cross under to the right into an Echelon Right formation.
- While gradually descending towards 800', smoothly turn left into the BRC, ideally ending up around 3 nm behind the boat. Normally there are no comms, but if you determine it's important for safety, call out "400, initial". For instance, if the pattern is crowded, the tower might appreciate the heads up, so they get the chance to give you a "spin it" instruction.
- As a general rule, this part of the CASE 1 recovery is less about numbers and more about looking outside the window, being adaptable and "making it happen". There is typically no reason to fly in any other way than the documented standards. But if things start to deviate, like the intervals becoming too small, use speed control and manipulate your flying in ways to help out and make things work out smoothly.
Entering the Break
- Pass the ship in Echelon Right formation at 800'. 350 kts IAS.
- Lead should break left either right above the boat, or 1 nm in front of it. Wingmen break with 17 seconds interval, making sure nobody proceeds farther than ~4 nm (not strict) ahead of the ship before breaking.
- If there are aircraft in front of you, delay the break until the last one is 45 degrees behind you, so you don't cut anyone off or end up too close downwind.
- At the break, go idle and extend speed brakes, turn hard left maintaining 800'and roughly 2 G's.
- Regardless how you perform the break, make sure you extend gears and full flaps as soon as you're below 250 kts, and make sure you end up at 1.1 - 1.3 nm from the course line when downwind.
- As you're entering the downwind, descend to 600' and add trim to fly on-speed.
The Final Turn
- When abeam (i.e passing the ship again), start turning final right away! Do NOT delay this turn as it will cause trouble for the aircraft behind you! A 30 degree bank is a good rule of thumb. Normally, there are no comms, but if it's relevant for the situation to make people aware of where you are, you can callout "400, abeam" at this point, for safety of flight.
- Turn when you should, regardless of what aircraft in front of you are doing. Do NOT extend the downwind to keep distance. Fly your own pattern, even if you get close.
- Descend slightly. Ideally you should be half-way through the turn ("at the ninety") at 450-500'. Take a look at the ship and start correcting your turn so you cross the wake and end up behind the angled deck ("entering the groove") around 15-18 seconds before wheels down.
- As soon as you see the meat ball, call out [Sidenumber] [Aircraft Type] Ball [Fuelstate]. For instance "400, Hornet Ball, 4.5". *
- Fly the ball all the way to touchdown.
- As soon as you touch down, ALWAYS add full power or even afterburner. Don't anticipate that you have caught a wire.
- Even if things look bad (like if you are too close to the aircraft in front), never take your own wave-off if there is an LSO. Fly like you intend to land until the LSO tells to wave off. Chances are the LSO intend to wave the other aircraft off and let you land. The aircraft in front can also bolter, making the runway available for you. If you absolutely HAVE to wave yourself off (like if there are no LSO, or he's CLEARLY missing an imminent collision), don't do it until you really have to (seconds before touch down).
*Note: IRL, during cyclic ops, there are no ball calls (they are implicit). Despite that, we have decided to keep the ball calls because we typically only have one LSO (if any), and the ball calls increase SA in a way that increases safety.
Bolters and Waveoffs
- If you get waved off, add power and fly over the angled deck. Don't over-do it, fly on-speed and climb to 600'.
- If you bolter (i.e. miss the wires) or get waved off, as soon as you have cleared the ship's bow, make a small right turn to align yourself with BRC.
- Keep 600'. Keep gear, flaps and hook extended. Continue flying on-speed.
- Visually scan the situation around you.
- When clear (other aircraft on downwind has passed 45 degrees behind you), turn left and re-enter the pattern downwind towards the abeam position, and try again.
- In the event that you get waved off early (for instance when on downwind or in the final turn), you simply follow the usual pattern, only maintaining 600'. After flying over the boat, the normal bolter/waveoff procedures apply.
On the Deck
- If you get caught in a wire and it won't release from the hook, wiggle the nose wheel left and right until it releases.
- Raise the hook and flaps, fold the wings, and quickly but carefully exit the runway to the right.
- Tower might provide parking instructions, otherwise, just park at any available spot. Since we don't have plane directors (as IRL), instead use the F2 camera to avoid taxi/parking accidents.
Spins
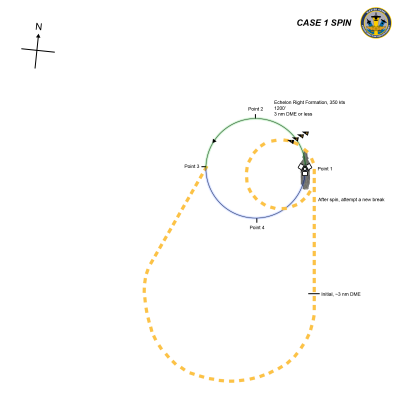
In rare cases, the boat might not be ready for your landing yet, or the pattern might be too crowded as you come in for the break. More than 6 aircraft in the pattern is to be avoided. Rather than having your flight going into the break, making the pattern even more crowded, tower can ask you to "spin it". If this happens, as you fly over the boat, go up to 1200' and initiate a left turn, with around 3 nm diameter. Keep the speed at 350 kts. Descend back to 800' as you approach a full circle. After making a full circle, enter the break as usual (unless you have to spin once more). You will stay in echelon right formation through this whole process.
Remarks
- We typically don't do shit-hot-breaks. However, if you are the flight lead of the first flight coming in for the break, and you feel comfortable with SHBs, you may perform one. For 4-ship, this is a common technique to keep the wingmen from having to fly farther than 4 nm in front of the boat before breaking.
- If somebody is in the groove, pause radio comms until they are down, have boltered or have been waved off. You don't want to step on an important LSO call.
- Because of the poor visibility in DCS, we are not strictly zip-lip during CASE 1. We try to keep the chatter to a minimum, but some radio calls can be made to improve everyone's SA.
- The CAG (i.e the mission planner in our case) may decide a tank limit and a number of additional passes required when you first show up at the ball. For instance, "Hornet Tank 3.0 and T + 2". Each pass is assumed to consume 500 lbs (1000 during night). So in the 3.0 T + 2 example, you need to have 4000 lbs when showing up on the ball for the first pass, 3500 on your second and 3000 on your third. If you bolter a third time you need to go to the overhead tanker.
- If no limits are pre-briefed, make sure to show up at the ball with at least 3000 lbs, and always hit the tanker if you go below 2000 lbs.


