Landing Procedures
Home >> Standard Operating Procedures >> Airport Procedures >> Landing Procedures
The following landing procedures are our standard ways of landing, regardless if it's a 4-ship (division), 2-ship (section) or a single aircraft.
Innehåll
VFR
Overhead Break
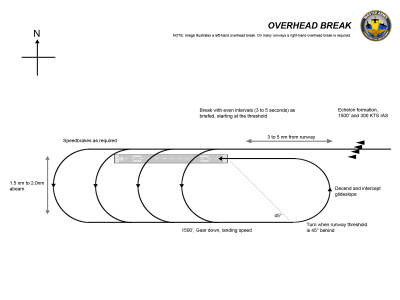
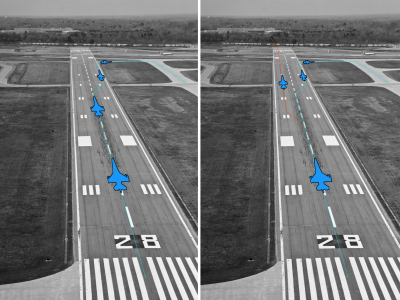
The standard landing pattern for arriving traffic is the overhead break. Straight in landings or formation landings must be requested well ahead of arrival to accommodate for increased spacing on final approach. All aircraft from all branches are expected to break at 1500 feet AGL and to maintain that altitude until turning base. The pattern direction is indicated on the Visual Operations Chart.
TacView example of overhead break
Other VFR Approaches
While the overhead break is our go-to way of landing a flight, any other kinds of VFR approaches may be used as well. As a lead, just keep in mind that it's usually valuable to keep things simple and use procedures that we are comfortable with, especially if flying with rookies. Hence, taking a small detour to line yourself up with the runway for a standard overhead break is typically a good idea, even if another, more exotic approach could be more effective.
IFR
During IFR (at night, or in bad weather) we do not use overhead breaks, but instead land using straight-in approaches. If both aircraft and runway is ILS equipped, you can use that. Otherwise you can use a TACAN approach, aligning the course line with the magnetic runway heading, and fly the correct glidepath by multiplying your distance with 300 to know which altitude (AGL) you should have. For instance, if you're 7 nm out, you should be at (7 x 300) 2100'.
Use sensor (radar or datalink) to maintain 2.0 nm between each aircraft.
Generic Procedures
Touchdown
Before landing, make sure you know at which side to exit the runway. If ATC is available, they will most likely provide this information. If there is no ATC, or they do not provide this information, the flight lead should decide a direction to exit (left or right) and communicate this to the wingmen (this side of the runway is sometimes referred to as the "cold side").
Land in the center (i.e. on the centerline) of the runway. As the speed reduces to taxi speed, gently drift to position yourself on the cold side. If you're having problems getting the speed down, let your aircraft instead drift to the other side (i.e. the hot side), where you can momentarily overtake the aircraft in front of you, or even take off again if needed. As soon as the speed is under control, take the cold side.
Go Around / Missed Approach
If the approach is aborted after the break, complete the pattern and position yourself overhead the runway and continue on the runway track. Climb gently to 1000 feet AGL to stay below arriving traffic and increase speed to 300 KIAS. You will then be cleared by tower to break again when the sequence is correct, this includes a climb to 1500 feet AGL.
Comms
Use common sense to let aircraft around you understand your intentions.
- Call out when you fly over and entry point.
- If there are other aircraft in the vicinity, call out when you're in the break.
- It's good practice for the lead to call out when he's turning final.
- If there's a human ATC you are not allowed to touch down unless they give you a "cleared to land" instruction.
- If the ATC still hasn't cleared you when you're on final, calling out "Adder11, on short final" is a good way of getting their attention.
- A landing clearance always goes for the whole flight (only the flight lead performs the readback).
- After the landing clearance (and your readback) there's generally no need for additional comms.

